Forsaken World's interface is a fully customizable HUD — draggable hotbars, resizable panels and a flexible chat that you can shape to your playstyle. Default keys: C character, B bag, K skills, N talents, Q quests, P pet, M map, J game shop. Cosmetic UI tweaks are fine; automation and bots are not.
Overview
Interface is Forsaken World's user interface — the panels, hotbars, character window, talent tree, chat and overlay HUD that you see on screen. Almost everything is draggable and resizable, so you can lay the screen out to suit your playstyle and reach every system in a keystroke.
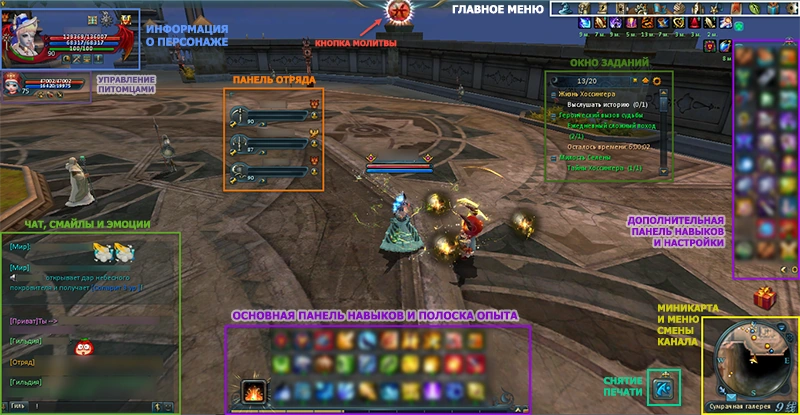
Game Client InterfaceThe Interface is the main window of the game client, providing access to various game functions and displaying current character information.
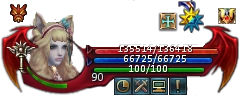
Character Information Panel
This static area in the top left corner of the screen shows key character stats: HP and MP points, spirit strength, rage level, selected faith branch, and noble level, along with quick access buttons.
The class icon is always to the left of the character portrait (e.g., - Priest).
Red bar — health points (HP).
Blue bar — mana points (MP).
Red and blue triangles toggle the display of HP and MP above the character's head.
Green bar — spirit strength needed for spirit skills.
After level 30, the portrait is bordered by the rage indicator.
The clock button () sets passwords and time blocks for account security.
Password is required for interactions with the warehouse, game shop, and mailbox.
Time block is a period after logging in during which trading, auction use, and warehouse access are restricted. The block duration can be adjusted (default is 3 minutes).
The crossed swords button () opens PvP settings.
The question mark button () opens the help window, providing useful information on skills, quests, and tips.
The exclamation mark button () informs about changes in Dark Age and upcoming updates.
The fifth button, available from level 20, notifies you of talent points received, which can be invested in development branches.
On the right side of the screen, blessings (buffs) and curses (debuffs) affecting the character are displayed, along with their remaining duration. Some effects stack, with each subsequent stack adding to the previous ones. Curses are always shown below blessings. Various statuses that affect the character or indicate action spots are also displayed here.
Additional Experience
Additional icons may appear above the character portrait.
A square with a blue cross opens the experience compensation window. Extra experience accumulates with slow growth and can be purchased with numias by clicking "Purchase." You can adjust the amount of experience to buy. You can also exchange Night Island visits for experience, paying with numias. Purchased extra experience increases all gained experience by 1.5 times until it runs out.
A gold medal activates Double Experience Mode when using an Experience Scroll. This mode lasts until the time expires (each scroll adds 30 minutes, up to 7.5 hours) and can be paused anytime. This feature allows reading multiple experience scrolls, saving inventory space.
A blue medal activates Double Faith Mode when using Prayer. This mode lasts until the time expires (each scroll adds 30 minutes, up to 23.5 hours) and can be paused anytime. This feature allows reading multiple prayers, saving inventory space.
A large golden star indicates the server is in increased experience and/or faith mode. Additional information is available in the tooltip when hovering over the star.
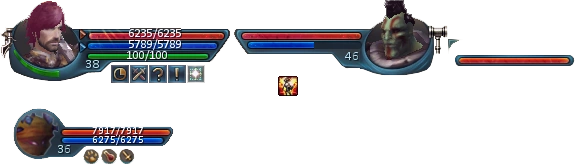
Information About Other Characters
Clicking on a target (pet, NPC, monster, or another player's character) shows an additional panel to the right of your character's info panel. It displays:
HP and MP indicators. Unlike your panel, the target's panel doesn't show exact HP and MP numbers, only bars.
Character level. Some monsters have a symbol indicating increased difficulty, independent of your character's level.
Character class or monster type.
Character or monster target. You can select your target's target by double-clicking it, useful when your party member is surrounded by enemies.
Curses and blessings are shown below the HP and MP indicators.
Separate panels exist for pets and party members. More details are available in their respective sections.
Interaction Menu
Party: Sends a group invitation or request to join if the character is already in a group.
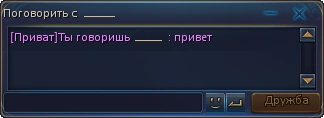
Private: Send a private chat message to the selected character. Clicking "message" in the dropdown sends text in a separate chat window.
Friends: Add the character to your friends list, allowing you to see their class, level, location, and channel (if online). You can also use an expanded personal chat in a separate window.
Follow: Follow the selected character.
View: View the selected character's equipment. Hovering over slots shows exact gear parameters.
Trade: Offer a trade to the selected character.
Duel: Offer a duel to the selected character. The duel starts 3 seconds after acceptance and ends when one character's HP reaches zero.
Relations: Social interactions menu. Invite to guild, take as an apprentice, gift flowers (requires fresh flowers or leaves for purchase in the game shop), and for romantics, male characters can carry female characters or invite them to ride together on a mount (requires a two-person mount).
Copy Name: Copy the selected character's name to the clipboard.
Ignore: Add the character to the ignore list, hiding their chat messages and preventing group invitations.
Report as Scammer: Report the character.
Chat
The chat consists of two blocks. The top block displays world chat, visible in all locations. To send a message, you need a "Loud Flute." Each message costs one flute. System information (e.g., boss appearances, events, and tips), experience, money, and items are also shown here. This chat block cannot be customized or removed.
The bottom block has 6 tabs for other channels, each fully customizable. To configure them, click the gear icon in the top left corner of the chat window.
Chat channels include:
Local: Messages visible to nearby players.
Party: Messages visible to party members. Use "~" before text to write here.
Guild: Messages visible to guild members. Use "!" before text to write here.
Private: For private messages. Format: "/Nickname message text."
Legion: Messages visible to legion members, available to guild members. Use "@" before text to write here.
World: Messages visible to all players. Use "#" before text to write here. Consumes one "Loud Flute."
Customize the chat window by clicking the icon in the top left of the bottom block. Choose tab content, transparency, and font size. Auto-reply can also be set.
The lock button freezes the chat area for easy reading, and the clear button deletes chat content. Deleted messages cannot be restored! Right-clicking a character's name in chat opens an interaction menu for private messages, group invites, friend requests, etc.
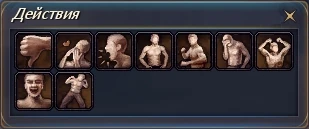
Emotions
Besides graphical emotions, characters can express sadness, joy, or dance. After learning a paired dance (scrolls available from players, auctions, or the game shop), invite a character of the opposite gender for a dance. To open the social emotions window, click the running man icon in the chat window. Emotions can be obtained through quests.
Experience Bar
Displays gained experience. Hovering shows current and required experience for the next level. At higher levels, a yellow arrow appears. Reaching the arrow fully restores HP, MP, and spirit strength.
If experience is purchased via the compensation menu, an additional green bar appears. Extra experience is gained until the blue bar surpasses the green.
Quick Access Bars
Organize skills, items, and mounts for easy use. Each bar can extend to 3 rows with an arrow button, then locked to prevent accidental removal. Locking uses a lock button.
Drag items and skills to the desired slot. If a slot is occupied, the existing item is removed. Removing an item from the bar doesn't delete it from inventory.
The left part of the lower bar has a spirit skill slot, a powerful skill available with a Spirit Stone equipped. The hotkey for activating the spirit skill is the ` key (the "Ё" / backtick key, top-left of the keyboard).
A second quick access bar on the right can also expand to three columns. It's useful for frequently used skills, professions, and consumables (HP and MP potions, food, drinks, various enhancing potions, etc.).
Both bars are functionally identical and interchangeable, but their screen orientation cannot be changed. By default, the first row of the lower bar is bound to keys 1–0, and the first column of the side bar to F1–F10. Game settings let you assign any panel slot a hotkey on the keyboard or a game controller (gaming mouse or joystick).
Mini-map
Depending on settings, it shows a small area around you with resources, NPCs, other players, their pets, and monsters.
The button adjusts the display of other players, pets, and monsters, and reduces graphics settings in crowded areas for better performance. The button adjusts resource visibility if relevant professions are developed.
Press M at any time to open the full world map for long-distance navigation.
Below the mini-map is an info panel showing your current location and channel.
Hovering over this panel shows connection info: current server, channel, server response time, and server time. Clicking the location name zooms the mini-map, and clicking the channel number quickly switches to another available channel. Other channels are useful if monster spawn points are occupied, and some bosses appear on all channels. Boss respawn times are in the schedule window (key U).
The autopilot window shows the last plotted course. Clicking the title resumes the interrupted path.
Quest Window
Allows quick viewing of taken quests, reading summaries, and setting autopilot.
Collapse individual elements by clicking next to a quest. Collapse or expand all elements with () in the top left corner.
The button configures the quest window (transparency, mission order, window size), and hides the panel to one line.
Zodiac Sphere
Hovering over the sphere at the top of the screen shows the current Era, today's prayers, and time until the next prayer.
Main article: Prayer
Main Menu
Located horizontally in the top right corner, it shows icons for quick access to important windows.
Character Attributes (key C)
Backpack (key B)
Skills & Talents — open your skill book with K, and the talent tree with N
Quests (key Q)
Pets (key P)
() Party Search and Management (key T)
Friends (key F)
Guild (key Y)
Professions (key O)
Event Schedule (key U)
Eyrie's Gallery, Game Shop (key J)
System Menu (key F12)
Mail
In-game mail allows characters to exchange letters with text and attachments.
Main article: Mail
Default Hotkeys
Every key below can be reassigned in the System Menu (F12) → Hotkeys, and the Default button restores this layout at any time.
Key
Opens
Key
Opens
C
Character Attributes
Y
Guild
B
Backpack / Bag
O
Professions
K
Skills (skill book)
U
Event / Daily Schedule
N
Talent tree
L
Achievements
Q
Quests
M
World Map
P
Pets
V
Faith
T
Party / Team
I
Rankings
F
Friends
J
Game Shop
F12
System Menu
`
Spirit-skill shortcut
Action bars: lower bar row 1 = 1–0, side bar column 1 = F1–F10, pet skills = Alt+1 … Alt+8.
FAQ
Q: Can I customize the UI?
A: Yes — most panels are draggable and resizable. Open the System Menu (F12) to adjust the HUD, hotbars, chat windows, and minimap, and to remap any hotkey.
Q: What are the most-used default keys?
A: C character, B bag, K skills, N talents, Q quests, P pet, T party, F friends, M map, J game shop, L achievements, U schedule, F12 system menu. The ` ("Ё") key fires your equipped spirit skill.
Q: Can I rebind keys?
A: Yes — open System Menu (F12) → Hotkeys, click any binding and press a new key. Press Default to roll everything back to the layout above.
Q: Are UI mods allowed?
A: The built-in interface is highly customizable, so most players never need add-ons. Purely cosmetic tweaks are tolerated, but any automation or bot-style tools are strictly forbidden.